

We have put together a list of some of the more frequently asked questions we receive in relation to using our products. You may find additional information in this section that can help with overall product knowledge as well as troubleshooting and processing tips
I want to make a mould of small figures, cast resin into the mould, and then paint them.
Materials to use: Pinkysil and Easycast.
Both are fast setting and low in viscosity to obtain the optimum amount of detail. If you are wishing to paint the cast item, wipe it down with Isopropyl Alcohol to remove anything off the surface such as a release agent and then lightly rough the surface with steel wool, scouring pad or similar, for better adhesion of the paint. A primer should be used to prep the surface prior to painting and should ideally be compatible with the paint that is used. An etch primer may help with paint adhesion as it is designed to penetrate the surface of the cast. Pinkysil and Easycast are especially easy to use for beginners and offer great results. If you need strength for machined parts, TC808 or TC890 could substitute Easycast.
I want to embed objects i.e., flowers into a clear resin.
Materials to use: Epoxycast, Ultrapour, Megapour
Make sure the object/s you are embedding are completely dry and sealed prior to embedding. Organic materials such as flowers or bones, must be dried out and preferably sealed with a lacquer or sealant. This helps eliminate bubbles as these organic objects are full of entrapped air. If you are unable to dry your objects out with silica, a sealant is suitable for preventing any trace amounts of moisture from negatively impacting the resin.
Why is my piece matte and not shiny/glossy?
Materials to use: Micromesh pads, Wet & Dry sheets, Polishing compounds e.g., Micro Gloss, Oils, Waxes
This is commonly due to the type of mould that the resin was cast into. If the original mould was taken from a matte object such as plaster or timber, the mould will be matte, and so the resin cast will produce a matte finish. If the mould was taken from a shiny object such as metal or a smooth & glossy plastic, the mould will be glossy, and the resin cast will be glossy too. The surface of the resin may be buffed to a shine; however, this can take a bit of work as you will need to go through several steps of sanding and buffing.
Some resins are easier to buff than others. Polyester resin has a higher hardness and the easiest one to achieve a really bright shine, whereas polyurethanes are softer in hardness and most labour intensive. The number of sanding and polishing steps one undertakes often comes down to the time you wish to spend and the tools you have access to. For example, you may choose to use wet and dry sandpaper from 120 grit all the way through to a 1500 grit or higher. This may be done by hand, or with a Dremel, or possibly a belt or orbital sander if applicable. Once you have worked your way through the sanding steps, you will have to choose a polishing compound which may be a liquid polish, oil or wax. There are many to choose from so you may need to conduct your own tests to achieve the exact finish you desire.
Do you sell doming resin?
Epoxyglass may be used for doming purposes. It is especially useful to coat Polymer clay pieces and over name badges or artworks. The medium viscosity of Epoxyglass helps achieve a dome-like effect.
Can I use food colouring in resin? Or acrylic paint, house paint, nail polish etc.
No, it is best not use anything other than resin pigments and powder pigments in resin. Resins do not respond well to moisture, so any additive that contains water (acrylic) may prevent your resin from curing properly.
Why has my resin piece failed to cure properly?
This can happen for several reasons, the most common being:
• Incorrect mixing ratio used
• Not mixed thoroughly enough
• Too much pigment added
• Volume used is too small for that product e.g. not enough mass for resin to exotherm or too little catalyst in the mixture to ensure material cures
• Less than ideal environmental conditions e.g. workspace that is too cold may cause resin embrittlement
• Contaminated mixing and measuring equipment
• Inhibition from mould material or embedded objects
• Storage of the resin e.g., if your resin has been stored in a cold environment, it may require conditioning prior to use.
• Resin that has not been conditioned will not perform as per the Technical Data Sheet.
Contact us to learn more about conditioning your resin system.
I have a 3D printed prototype; how do I prepare it for moulding?
There are different types of 3D printing materials, some resulting in more visible ridges and some that cause inhibition to moulding rubber.
The ridges that are more common in PLA and ABS prints may be dissolved using Acetone with ABS and Ethyl Acetate for PLA, or through multiple stages of sanding and coating. Once this is complete a silicone may be selected based on the shape of the part and the intended casting material.
We do not sell a coating system for SLA or Resin 3D printed parts, however, there are a few steps that may be taken prior to moulding. First clean the print in Isopropyl Alcohol and then wash it in warm soapy water. Allow it to fully dry and then place it in direct sunlight for several hours or a UV curing chamber to ensure the model has completely cured. Rotate the item during this time to ensure all sides are exposed. This step will be different for each print as the size, colour and surface area will dictate these factors. Clear prints will cure the fastest. For the best chance of avoiding inhibition a Condensation/Tin silicone system should be selected.
Where can I find the heat resistance of (resin product)?
All Barnes resins should have a Technical Data Sheet (TDS) located under the Technical Documents section on the product page online. The TDS will offer additional information including the heat resistance of that product. You will find this commonly listed as HDT or Heat Deflection Temperature and it will state a specific temperature limitation. If this test is not listed, it may discuss heat resistance in the description as it applies to a particular application such as coating coasters. If no information is listed, the test has not been performed by the manufacturer and you may need to perform your own test to ensure the resin meets your applications requirements.
Why should I double mix?
If your product provides a decent work time, transferring your mix from one mixing vessel to another can ensure all unmixed material at the base of the first vessel is now at the top of the second. This is particularly helpful when you are using cups with ridges at the base where unmixed material may not be blended.
Which release agent should I use?
Click Here – Barnes Release Agents Selection Guide
Vacuum degasser vs Pressure Pot – What should I use?
To keep it simple, a vacuum degasser removes the air from your material by pulling vacuum within the chamber. This may be used on both rubbers (silicone & PU) or resins (Epoxy & PU). Depending on the mixing vessel you select and the viscosity of the material, some systems take longer to degas than others. Ensure the work time of your product allows for this. You will also need to ensure that you have accounted for the material rising at least 2 x its original size, in some cases 5-7. Wide and deep vessels make the most of the area within the chamber. This process typically takes just a few minutes and then you are ready to ready to pour.
A pressure pot allows air to flow into the chamber putting pressure on your mould or material and shrinks the air until it is microscopic. If you are looking to use a pressure pot to cast resin in a silicone mould, you must ensure the silicone mould was poured under the same amount of pressure otherwise the mould may distort if there are air bubbles within the mould walls. A pressure pot is more commonly used for resin as opposed to rubbers. When using a pressure pot you will have to run the compressor throughout the entire cure time of the material to ensure it works.
What does post curing mean?
This is the process of exposing your part to elevated temperatures over a certain period which helps speed up the curing process along with ensuring the part reaches its full physical properties as stated on the TDS. Please check the products TDS for specific instructions.
Why do I need to use Poly Purge?
Poly Purge is used in resins to purge out moisture from within the resin bottle/pail/cube after it has been opened. This helps prevent product deterioration from moisture. This is especially helpful if you use your resin kit sporadically or for anyone living in areas that experience high humidity.
How long do I need to vacuum my resin/silicone?
Degassing times will vary depending on the physical properties. A material with a lower viscosity will degas much faster compared to one with a high viscosity. The elasticity of the material will also affect degassing times. It is also a good idea to use a wider mixing vessel, so that the material is more spread out and the air has less distance to travel through the material and up to the surface.
What is the difference between Aromatic and Aliphatic Polyurethanes?
Aromatic are the more common of the two as they tend to be more economical, exhibit good physical properties, and come in rigid and elastomer formulations. The downside of Aromatic resins can be poor UV and chemical resistance. Some Aromatic Polyurethanes we supply are Easycast, Procast and TC808.
Aliphatic polyurethanes can exhibit great UV & colour stability, and chemical resistance. Their downside is typically longer work times and de-mould times, low heat distortion, low tolerance to colder casting temperatures, and higher material costs. Some Aliphatic Polyurethanes we supply are the Water Clear range in both rigid and flexible formulas.
What does Shore hardness mean?
There are different Shore hardness scales that measure the hardness of a particular material. Silicones may fall into the Gel00 to Shore A hardness range, and resins may range from a Shore A to D. Click here for our Shore hardness chart to see more examples.
What is the difference between addition and condensation cure silicones?
All our moulding silicones are RTV-2 systems (Room Temperature Vulcanizing – 2 components)
Addition or Platinum curing silicones cure by mixing two components together, allowing them to cure in an ambient room temperature. A cooler environment will extend the cure time, and a warmer environment can accelerate the cure. These systems offer negligible shrinkage rates and are compatible with a wide range of casting materials. Addition curing systems may be subject to inhibition, for example contact with Sulphur, Tin, Latex and Amines can negatively affect the silicone and it may fail to cure resulting in inhibition. Addition curing silicones often have a longer library life compared to Condensation silicones which is one of the reasons they are often at a higher price point.
Condensation or Tin based silicones cure by mixing the two components together, in addition to drawing moisture from the atmosphere. A relative humidity of at least 50% is recommended to ensure your silicone cures properly. This type of silicone takes in moisture and then releases an alcohol which is a by-product of its cure. This may prevent the use of certain casting materials such as Aliphatic polyurethanes and Addition curing silicones. The approximate shrinkage for most condensation silicones is between 0.4% to 0.7%. The nature of this silicone allows it to be poured on surfaces containing moisture including defrosted animals (taxidermy), food and other organic items. As these silicones have a shorter library life, they are often more economical.
Why is my silicone curing too fast?
The temperature of your workspace and the temperature of your material prior to working will ultimately dictate your work and cure time. Ensure both product and environment are at the recommended temperature indicated on the TDS. For Condensation Silicone users only, you may be able to lower the ratio of the catalyst to allow for a longer work time. Note that high humidity (over 80%) will accelerate Condensation Curing systems.
How many casts will I get from my mould?
There are many variables that will affect the lifespan of your mould
– The casting material selected (aggressive vs non-aggressive)
– How your mould is stored including the temperature of your storage space and position
– Whether release agents are used
– How often you clean your mould and how?
– The frequency of use, downtime in between casts etc.
We recommend storing your mould in a cool, dry space, and if possible, cover it from dust and contamination but allow ventilation. You may also need to store your mould upside down and/or add additional support so that it doesn’t warp in storage. Try to avoid casting different materials into the same mould and let it rest in between casts. If your mould needs to be cleaned avoid aggressive solvents and use warm soapy water, rinse thoroughly and allow to air dry.
Skin Safe? Food Safe? Medical Grade? What is the difference?
You may find that you require a silicone system that requires a particular certification. It is important to understand the limitations of each type and decipher between the different certifications mentioned below.
– Skin Safe Silicones are those that are safe to apply to the skin for life casting and moulding applications i.e., our Pinkysil ODDBOD. They may also be used to make parts for applications such as prosthetics that are adhered to the skin i.e., our Platsil Gel range. Skin safe silicones are only found in Addition/Platinum curing systems, and they may be pigmented with skin safe silicone pigments. These silicones are not designed for internal use and are only for temporary and non-permanent contact with the skin. A theatrical prosthetic application may be adhered for several hours and mould making applications are typically produced in less than 1-2 hours. Although these silicones have skin safe certification, some individuals with sensitive skin may require a patch test prior to use.
– Food Grade silicones come in different types of processing systems, some may be hand poured and others are injection moulded. No odor or flavour is produced by these silicones in order to meet food safe compliance. For food-contact applications, post-curing is recommended and even essential in order to meet legal requirements. You may need to post cure and clean your mould prior to using it. Food safe silicones are only found in Addition/Platinum curing systems such as M4601, M4670 and the Vario series. Common applications include Chocolate, Marzipan, and Ice Cream. Not all food safe silicone moulds are designed to be used in ovens at high temperatures so make sure you have selected the correct silicone for your application. High temperatures in ovens may dry out your silicone mould and cause it to break down and crack.
– Medical Grade Silicones require that they are tested for biocompatibility. Medical Grade silicones are often separated into 3 categories, non implantable, short term implantable, and long-term implantable. Most medical grade silicones are LSR (Liquid Silicone Rubber) systems that are processed via injection moulding and not by hand. This is to minimize error and for health and safety purposes. Some products that fall under this category would be Adult Toys, Catheters, Implants, Menstrual Cups, Respirators and Specialized seals and gaskets. We do not supply any medical grade Silicones.
What is the difference between transparent and translucent?
Materials that are optically clear are referred to as transparent. When light encounters transparent materials, almost all light passes through the object and details on the other side are clearly visible.
Materials that are identified as translucent also have clarity when light strikes through, however, only limited light passes through making details on the other side visible but not clearly identifiable.
How do I paint silicone?
As silicone only bonds to itself, you will need to use a silicone-based painting medium. If the piece is detailed, e.g. a prosthetic, you may use A07 which offers a low viscosity. Mix this with D-Limonene or Shellite and it can be applied in thin layers along with a suitable silicone pigment or an alcohol palette.
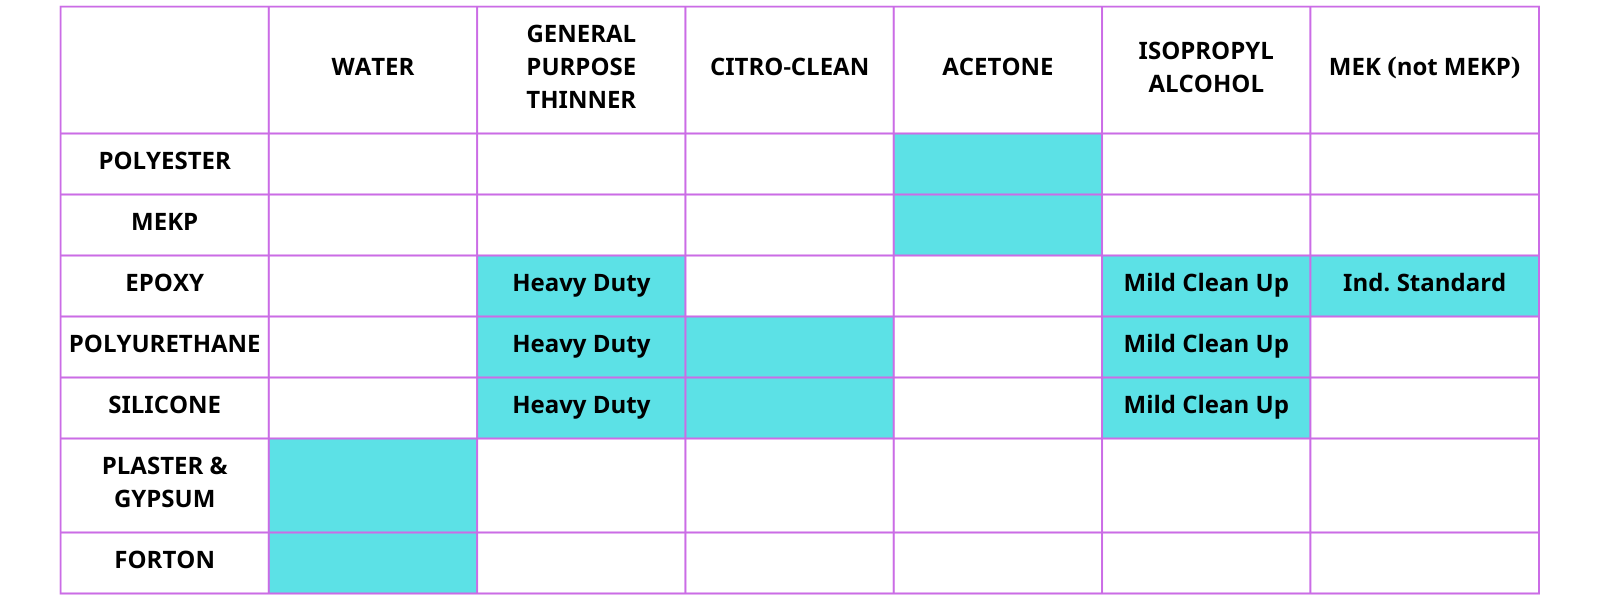
Which solvent should I use for clean-up?
What material do I use to make a mould for casting concrete/cement?
Moulds made out of flexible polyurethane are perfect for concrete casting. It is because this particular rubber is extremely strong, has a lower viscosity than many silicones, and is more economical compared to silicones. Polyurethane rubber is extremely durable, so for large industrial concrete pours it is the best option. We offer the Flexicast Polyurethane series for this. You will need to ensure the appropriate release agents are selected when using a Polyurethane due to its adhesive nature.
Both Addition and Condensation silicones may be used to make moulds for concrete casting. Tufsil is a great budget silicone for large pours, is fast working and has the durability required for concrete, although, strictly speaking, addition cure silicone such as M4642 should always be the first point of call.
How can I find out more about expansion rates and volume for foams?
See table below for more information. These figures are based on ideal mould preparation, environmental conditions, and processing methods. Click here for our Handling Polyurethane Foam Guide.
| POLYURETHANE FOAM | EXPANSION | KG/M3 TO VOLUME |
| SFOAM50 | X 20 | 1000/50 = 20 100gm x 20 = 2L |
| SFOAM65 | X 15 | 1000/65 = 15 100gm x 15 = 1.5 |
| SFOAM128 | X 7.8 | 1000/128 = 7.8 100gm x 7.8 = 780ml |
| RFOAM33 | X 30 | 1000/33 = 30 100gm x 30 = 3L |
| RFOAM100 | X 10 | 1000/100 = 10 100gm x 10 = 1L |
| RFOAM200 | X 5 | 1000/200 = 5 100gm x 5 = 500ml |